|
Cupping
 Cupping
is the technique used by cuppers to evaluate the flavor
profile of a coffee. To understand the minor differences
between coffee growing regions, it is important to cup coffees
from around the world side by side. Cupping is also used
to evaluate a coffee for defects or to create coffee blends. Cupping
is the technique used by cuppers to evaluate the flavor
profile of a coffee. To understand the minor differences
between coffee growing regions, it is important to cup coffees
from around the world side by side. Cupping is also used
to evaluate a coffee for defects or to create coffee blends.
Cupping Technique
Table Preparation: In a cupping session the table
is usually set up with 6 to 10 cups per sample in a triangular
(bowling pin) fashion, a sample of the roasted coffee, a
sample of the green coffee, a cup of room temperature water,
and an empty cup containing the cupping spoons. I heavily
recommend covering both the green sample and roasted sample
until the cupping session is over and the fragrance, aroma,
and flavor profile have been documented. After this time
the samples could be uncovered and additional comments can
be written based on appearance. This method will help reduce
the all too common "eye cupping" technique.
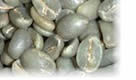
Sample Preparation: To prepare the samples place
2 tablespoons of freshly roasted and freshly ground coffee
in a 6 oz cup. Ideally one should use 55g of coffee per
liter of water. The grind should be between a French press
size and a drip coffee size. The coffee should be roasted
light (Agtron 65). In the industry we often stop the roast
about 30 seconds into the first crack long before the start
of the second crack. This allows us to fully evaluate the
coffee for defects and for the sweetness and aroma that
are burned off at darker roasts. The roast should be similar
for all of the coffees evaluated. During an important cupping
session the roast similarity can be verified visually by
grinding a portion of each sample and lining the samples
up next to each other on a black sheet of paper.
Fragrance and Aroma Analysis: While the filtered
water is boiling, smell the grounds and write down your
observations. The smell of the grounds (before water is
added) is referred to as the fragrance.
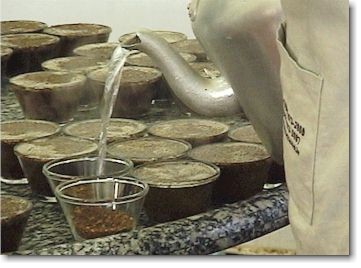
Then add hot water just off the boil to each the cup. At
this time you should also add hot water to the cup containing
the spoons so that the spoons stay at the same temperature
as the cups containing the coffee. Smell each cup without
disturbing it and write down your initial observations of
the aroma.
After 1-2 minutes break the crust of the coffee using one
of the preheated spoons. Put your nose directly over the
cup and push the coffee down. This is the most potent burst
of aroma you will have during cupping and is the best time
to evaluate the aroma. As you break the crust stir the cup
a little to make sure all of the coffee is covered in water
and to help the coffee sink to the bottom of the cup. Add
any further description of the aroma to the description
you wrote before breaking the crust.
Rinse the spoon in hot water and move to the next sample.
After evaluating the aroma of all of the samples, scoop
out any grounds that continue to float. Due to the high
density of the lightly roasted coffee most of the grounds
will sink.
Flavor Profile Analysis: After the coffee has cooled
sufficiently take some coffee into the spoon and slurp the
coffee strongly to aspirate it over the entire tongue. It
is important to aspirate strongly since you are trying to
cover the entire tongue evenly. Aspirating strongly will
also causes tiny droplet of coffee to be distributed into
the throat and into the nasal passage where the nose can
act as another powerful tasting tool. Most of the flavor
observed in a coffee is a result of aromatic compounds present
in the coffee. This effect can be demonstrated by plugging
your nose while drinking coffee. While the nasal passage
is blocked the coffee will likely taste similar to instant
coffee due to its lack of aroma. When the nasal passage
is opened a full rainbow of flavors will immediately become
evident.
Write down your observations of flavor, acidity, aftertaste,
and body. Move to the next cup and try to compare the different
cups. As the coffee in each cup cools, it is often possible
to detect new flavors. Therefore, it is important to cup
a coffee when it is both warm and when it has cooled to
just above room temperature. The best coffees will have
positive characteristics at both ranges of temperature.
If you are cupping more than a couple cups of coffee, it
is advisable to spit out the coffee after evaluation. When
cupping several coffees it is possible to have too much
caffeine, which can adversely alter your cupping ability.
 Conclusions:
The key to cupping is practice and humility. The best cuppers
I know are modest and always eager to learn more. I have
served on cupping juries with some of the best in the world
and we do not always agree. The beauty is that we agree
to disagree while respecting and trying to identify the
characteristics that other people find. Conclusions:
The key to cupping is practice and humility. The best cuppers
I know are modest and always eager to learn more. I have
served on cupping juries with some of the best in the world
and we do not always agree. The beauty is that we agree
to disagree while respecting and trying to identify the
characteristics that other people find.
Do not be intimidated by people that try to impress you
with some abstract description of a coffee. This is more
of a romantic tribute to a coffee rather than a reality.
Cupping should be fun and interesting, but not a contest
of who has a better vocabulary. On the other hand, your
description should be more substantial than a reiteration
of a textbook definition of a coffee.
Despite the strict, scientific-like protocol to cupping,
the method followed in the industry is quite varied and
almost every good cupper has his or her own permutation.
Cup under conditions you like, but try to stay close to
the standards in case you need to cup with other people.
The secret to becoming a good cupper is simple: trust yourself
by practicing regularly and be humble enough to continue
to learn from others.
Cupping
Videos
Entire
cupping process with Silvio Leite of Agribahia: medium
(22.5 Mb) or small
(6.72 mb).
Cupping
(less detailed) at Fazenda Monte Alegre: medium
(8.73 mb) or small (4.6
mb).
Cupping
final stage only: medium
6.7 mb.
Related
Articles
Cupping
Room Conditions
Coffee
Cupping Form
Tongue
Maps for Coffee
|